
How to backup an external server with a Synology NAS using rsync
I recently bought a Synology NAS and I’m mostly happy with it. Additionally I bought a Raspberry Pi and installed Raspbmc on it – this made my setup at home even better.
Recently I thought about how to use my NAS to improve the backup workflow of my (external) VPS servers. Currently they are doing a very simple backup (make a gzipped tar of important files and database dumps, encrypt them with GnuPG and rsync them to the hosters' backup space) every night. I keep the backups of a few days back and remove older backups. To store a few backups locally (just in case…) I used to download a backup manually every week (well, at least that was the plan). I don’t have to tell you – downloading backups manually isn’t much fun and in the last time I didn’t really keep up with this plan.
My solution to improve this manual workflow was to set up the local NAS to fetch all the stored backups from the hosters' backup space (or from the server itself) via rsync so that I have all the backups also on my local NAS. It’s really simple and only requires a few steps. The good thing is that you can add this backup nicely with the Synology DSM user interface since the latest version 4.2, which introduced user-defined scripts in the task scheduler.
Let’s get started. The most important part is the shell script which connects to the backup server, authenticating against the server with a private SSH key and synchronizing the backups with the NAS via rsync. The good thing is that Synology NAS devices run a Linux operating system, making things like this very easy. The bad thing is that the locations of binaries differ from other linux systems (partly because Synology customizes many of the tools to suit their needs) so you have to find the locations of the binaries first.
However, this is the shell script I hacked together:
#!/bin/bash

USER="backupuser123"
SERVER="backupserver.my-vps-hoster.net"
PORT="22"
SSHID="/volume1/homes/admin/server-backups/the-name-of-my-server/filename-of-my.private-key"
SOURCE="/data/"
TARGET="/volume1/homes/admin/server-backups/the-name-of-my-server/backups/"
LOG="/volume1/homes/admin/server-backups/the-name-of-my-server/backup.log"

/usr/syno/bin/rsync -avz --delete --progress -e "ssh -p $PORT -i $SSHID" $USER@$SERVER:$SOURCE $TARGET >> $LOG 2>&1
Just a few explanations: in the first three lines I’m configuring the user, host and port of the server I want to sync with (in my case this is the backup space of my hoster where I’m storing the encrypted backups). The variable SSHID stores the path to my private SSH key on the NAS which is used to authenticate against the server, so I don’t have to use a password. As you can see in the path I’m using the home directory feature of the Synology NAS which creates a home directory for every NAS user; I added a folder for the backup-related stuff to the home directory of the “admin” (equals partly to root) user. The SOURCE variable stores the absolute path of the remote directory I want to sync. TARGET stores the absolute path to the folder on the NAS where I want to sync the backups to. Just to track down possible problems later I’m writing the output of the rsync status to a file called backup.log, the path to this file is stored in the LOG variable. To find out the appropriate paths on your device you can use the shell of your NAS via SSH access.
I placed the shell script under /volume1/homes/admin/server-backups/the-name-of-my-server/sync-backups.sh and set the file permissions to 700 (as for every script it’s important to make it executable). You can do this by throwing the file to the NAS via CIFS/NFS and change the permissions e.g. via “File Station” in the web-based GUI – or enable SSH access to the NAS, edit the file with vi and set the permissions via the shell. You should create the “backups” folder or use an existing different folder for the backups – but remember that it should be empty, or rsync will delete its contents! Also creating the “backup.log” log file might be a good idea. You should also place the private RSA key for SSH access to the source server on the specified location and remove all permissions except read permissions for the admin user.
Now that everything is in place we’re ready to test this script. At this point you should have SSH access to the NAS (which you can enable in the DSM – Control Panel > Terminal). Log into the device using the admin or root user and using your password. Navigate to the location of the shell script and run e.g. “./sync-backups.sh”. The first time you’re doing this you’ll get asked if you want to trust the host you’re connecting to (at least if you never connected to this server via SSH from your NAS) – this is the reason why you should run it on the shell for the first time. If you say “yes” it will store the public RSA key in the users' home directory in the file ~/.ssh/knownhosts. This step is very important, otherwise your automatic syncs won’t work. This is also the point where I had the most problems: I connected via SSH to the NAS with the “admin” user, therefore the host was stored in the knownhosts file of the “admin” user. Until this point I thought the “admin” user is somehow identical with the “root” user. I still don’t know how exactly they are related to each other, but what I found out is that even after I added the server key to known_hosts with the admin user and the script ran fine on the shell, I wasn’t able to run the task as scheduled task via DSM (even if I set the task up to run as “admin”). I always got this error:
Host key verification failed.
rsync error: unexplained error (code 255) at io.c(687) [Receiver=3.0.9]
The solution was to log into the NAS with the “root” user (same password as the “admin” user) and run the shell script. I was asked again if I want to trust the server, and then the job ran nicely. Voilá – you should now see your server backup in your backup folder!
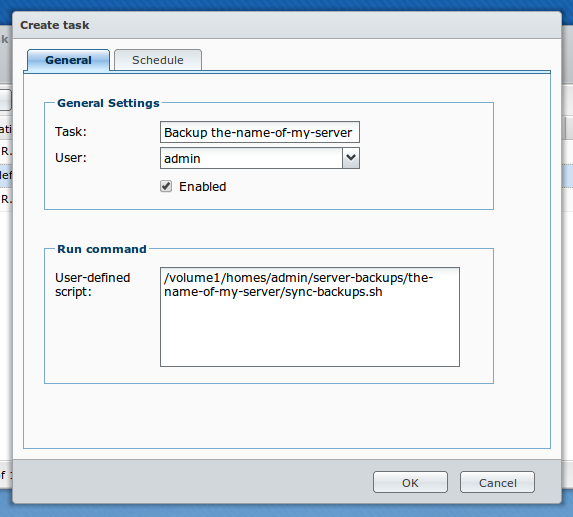
Ok. After you placed the script onto the NAS, created the logfile and the backup directory, set the appropriate permissions and added the remote host to known_hosts, the only thing left is to set up the job via Synology DSM. Go to the Control Panel > Task Scheduler and create a task with the type “User-defined script” (as mentioned earlier this requires DSM 4.2, otherwise you have to add the cronjob manually). You just have to assign a name, set the task to run as “admin” and specify the path to the script.
In the tab “Schedule” I set the task up to run daily – and set the time about one hour after my server does his backup (to make sure it’s always done before Synology starts to sync). To make sure everything works you can select the task in the list (after saving it) and click on the “Run” button. You can check the log file you specified in the shell script a few moments later to make sure no errors are popping up!

 I'm a software developer living and working in Mannheim, Germany.